
Mastering Astrophotography: Seamless Workflow Integration with Sequator for Stunning Night Sky Edits
Step 1: Importing Photos into Sequator
Start by importing your photos into Sequator. Ensure that you have a series of images ready for stacking, such as star trails or night sky shots. These images I usually recommend preparing in Adobe Camera Raw or Adobe Lightroom.
1.1: Sorting and Initial Selection
Organize your photos chronologically and select the images you intend to use for stacking.
In Adobe Bridge or Lightroom, you can easily navigate and select your desired shots.
1.2: Opening in Adobe Camera Raw
Right-click on the selected images and choose "Open in Camera Raw" to access the raw editing capabilities.
Adobe Camera Raw provides a powerful interface for making initial adjustments before the stacking process.
1.3: Basic Adjustments
In Adobe Camera Raw, focus on basic adjustments such as exposure, contrast, highlights, shadows, and whites.
Fine-tune the white balance to achieve the desired color temperature for your night sky shots.
Adjust clarity, vibrance, and saturation to enhance overall image vibrancy.
1.4: Lens Corrections and Noise Reduction
Address lens distortions and chromatic aberrations by navigating to the "Lens Corrections" tab.
Apply minimal noise reduction to mitigate any noise present in the individual images.
1.5: Cropping and Straightening
Crop or straighten images as needed to improve composition and alignment.
Ensure a consistent look across all images to facilitate smooth stacking.
1.6: Saving Adjusted Files
Once satisfied with the adjustments, save the edited images as high-quality TIFFs (or whatever image type suits your needs best)
These edited files will serve as the input for Sequator's stacking process.
By incorporating these preliminary adjustments in Adobe Camera Raw, you lay the groundwork for a more refined and polished result during the stacking and subsequent editing stages. Now, proceed to import these prepared images into Sequator to continue with the astrophotography workflow.
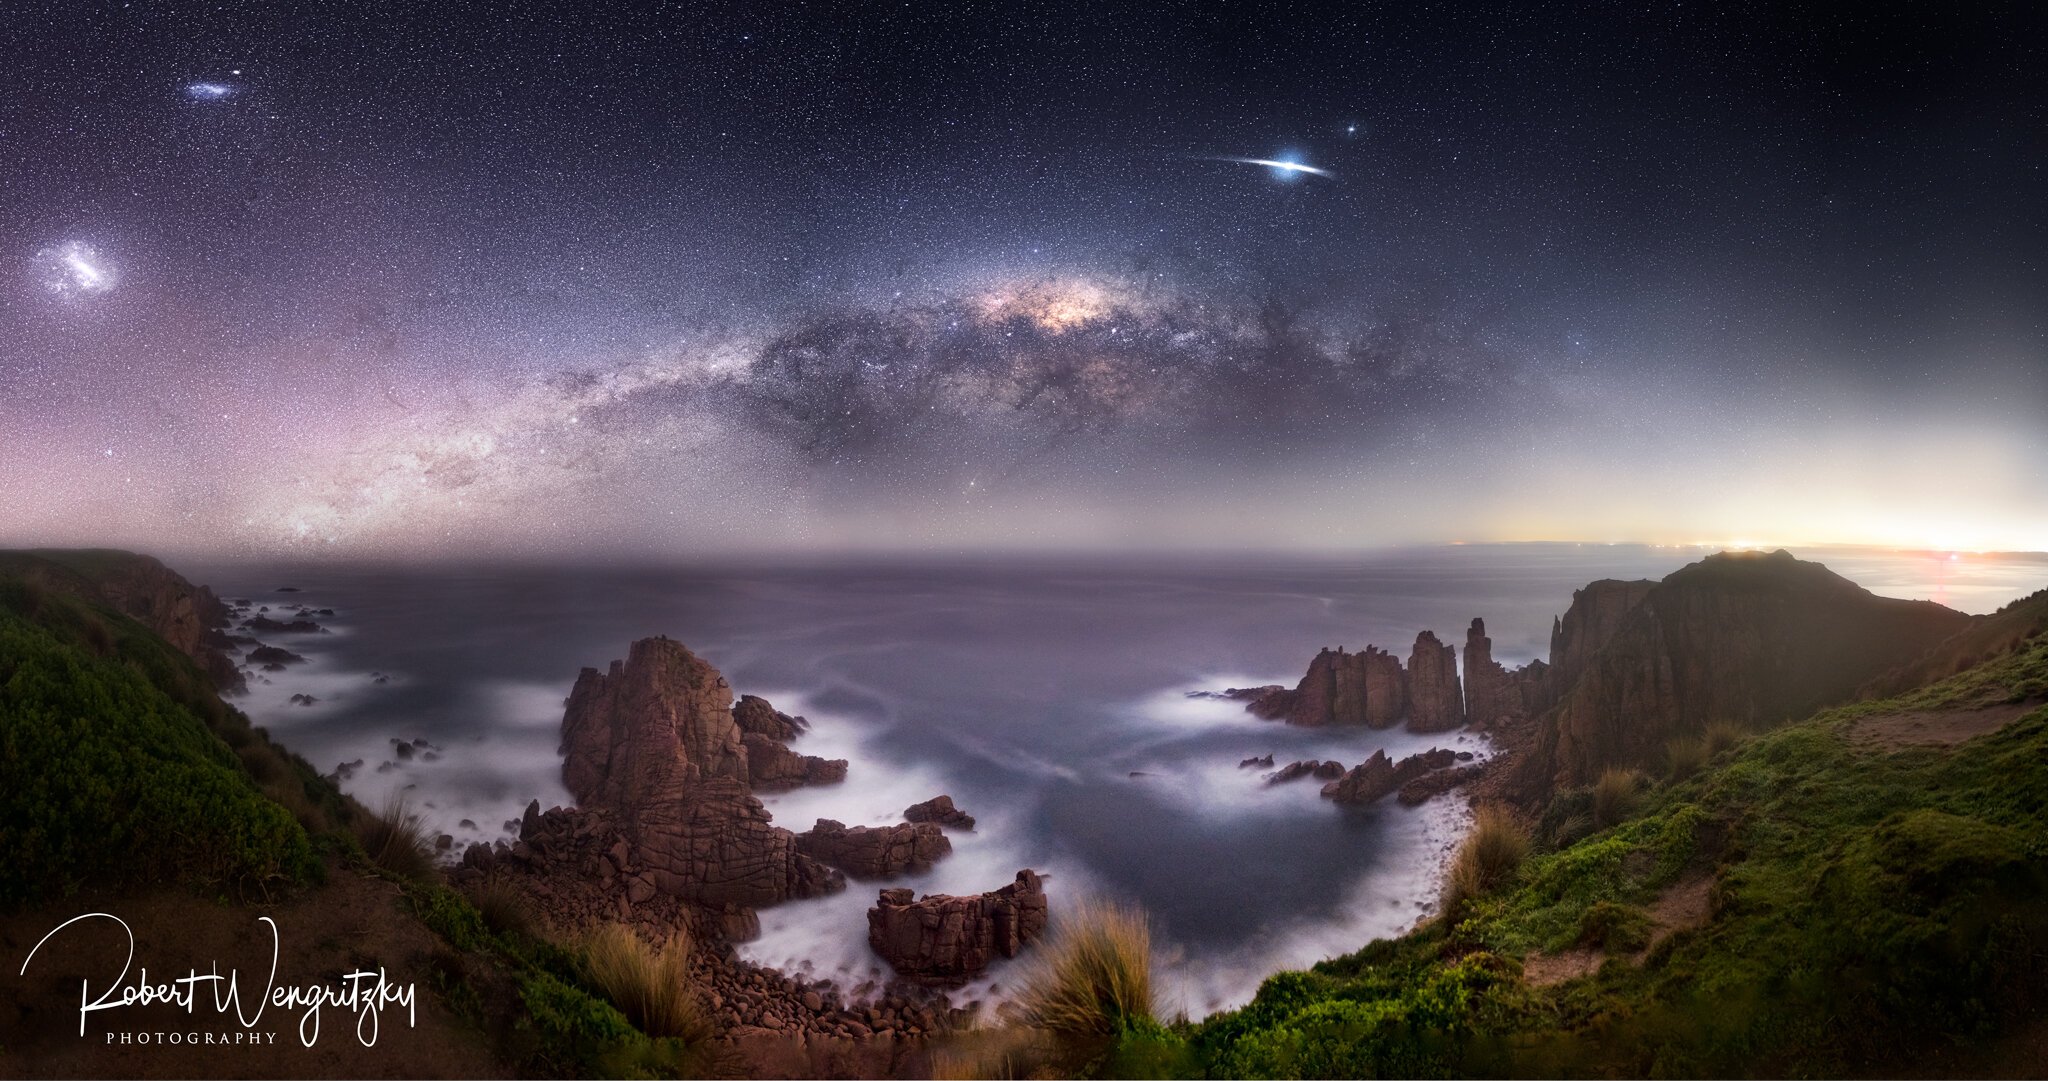
Over 300 images make up this large panorama. I took 8 stacks per sky segment, prepared them all in Adobe Raw prior to stacking each block in Sequator. Taken at Woolami, Pinnacle.
Step 2: Stacking in Sequator
Adjust stacking parameters in Sequator to create a well-stacked base image. For more information as to my stacking process, see my other tutorials on Sequator.
Utilize Sequator's noise reduction and hot pixel removal features for cleaner results.
Preview and export the stacked image.
Step 3: Importing Stacked Image into Photo Editing Software
Open your preferred photo editing software (e.g., Adobe Photoshop or Lightroom).
Import the exported stacked image from Sequator.
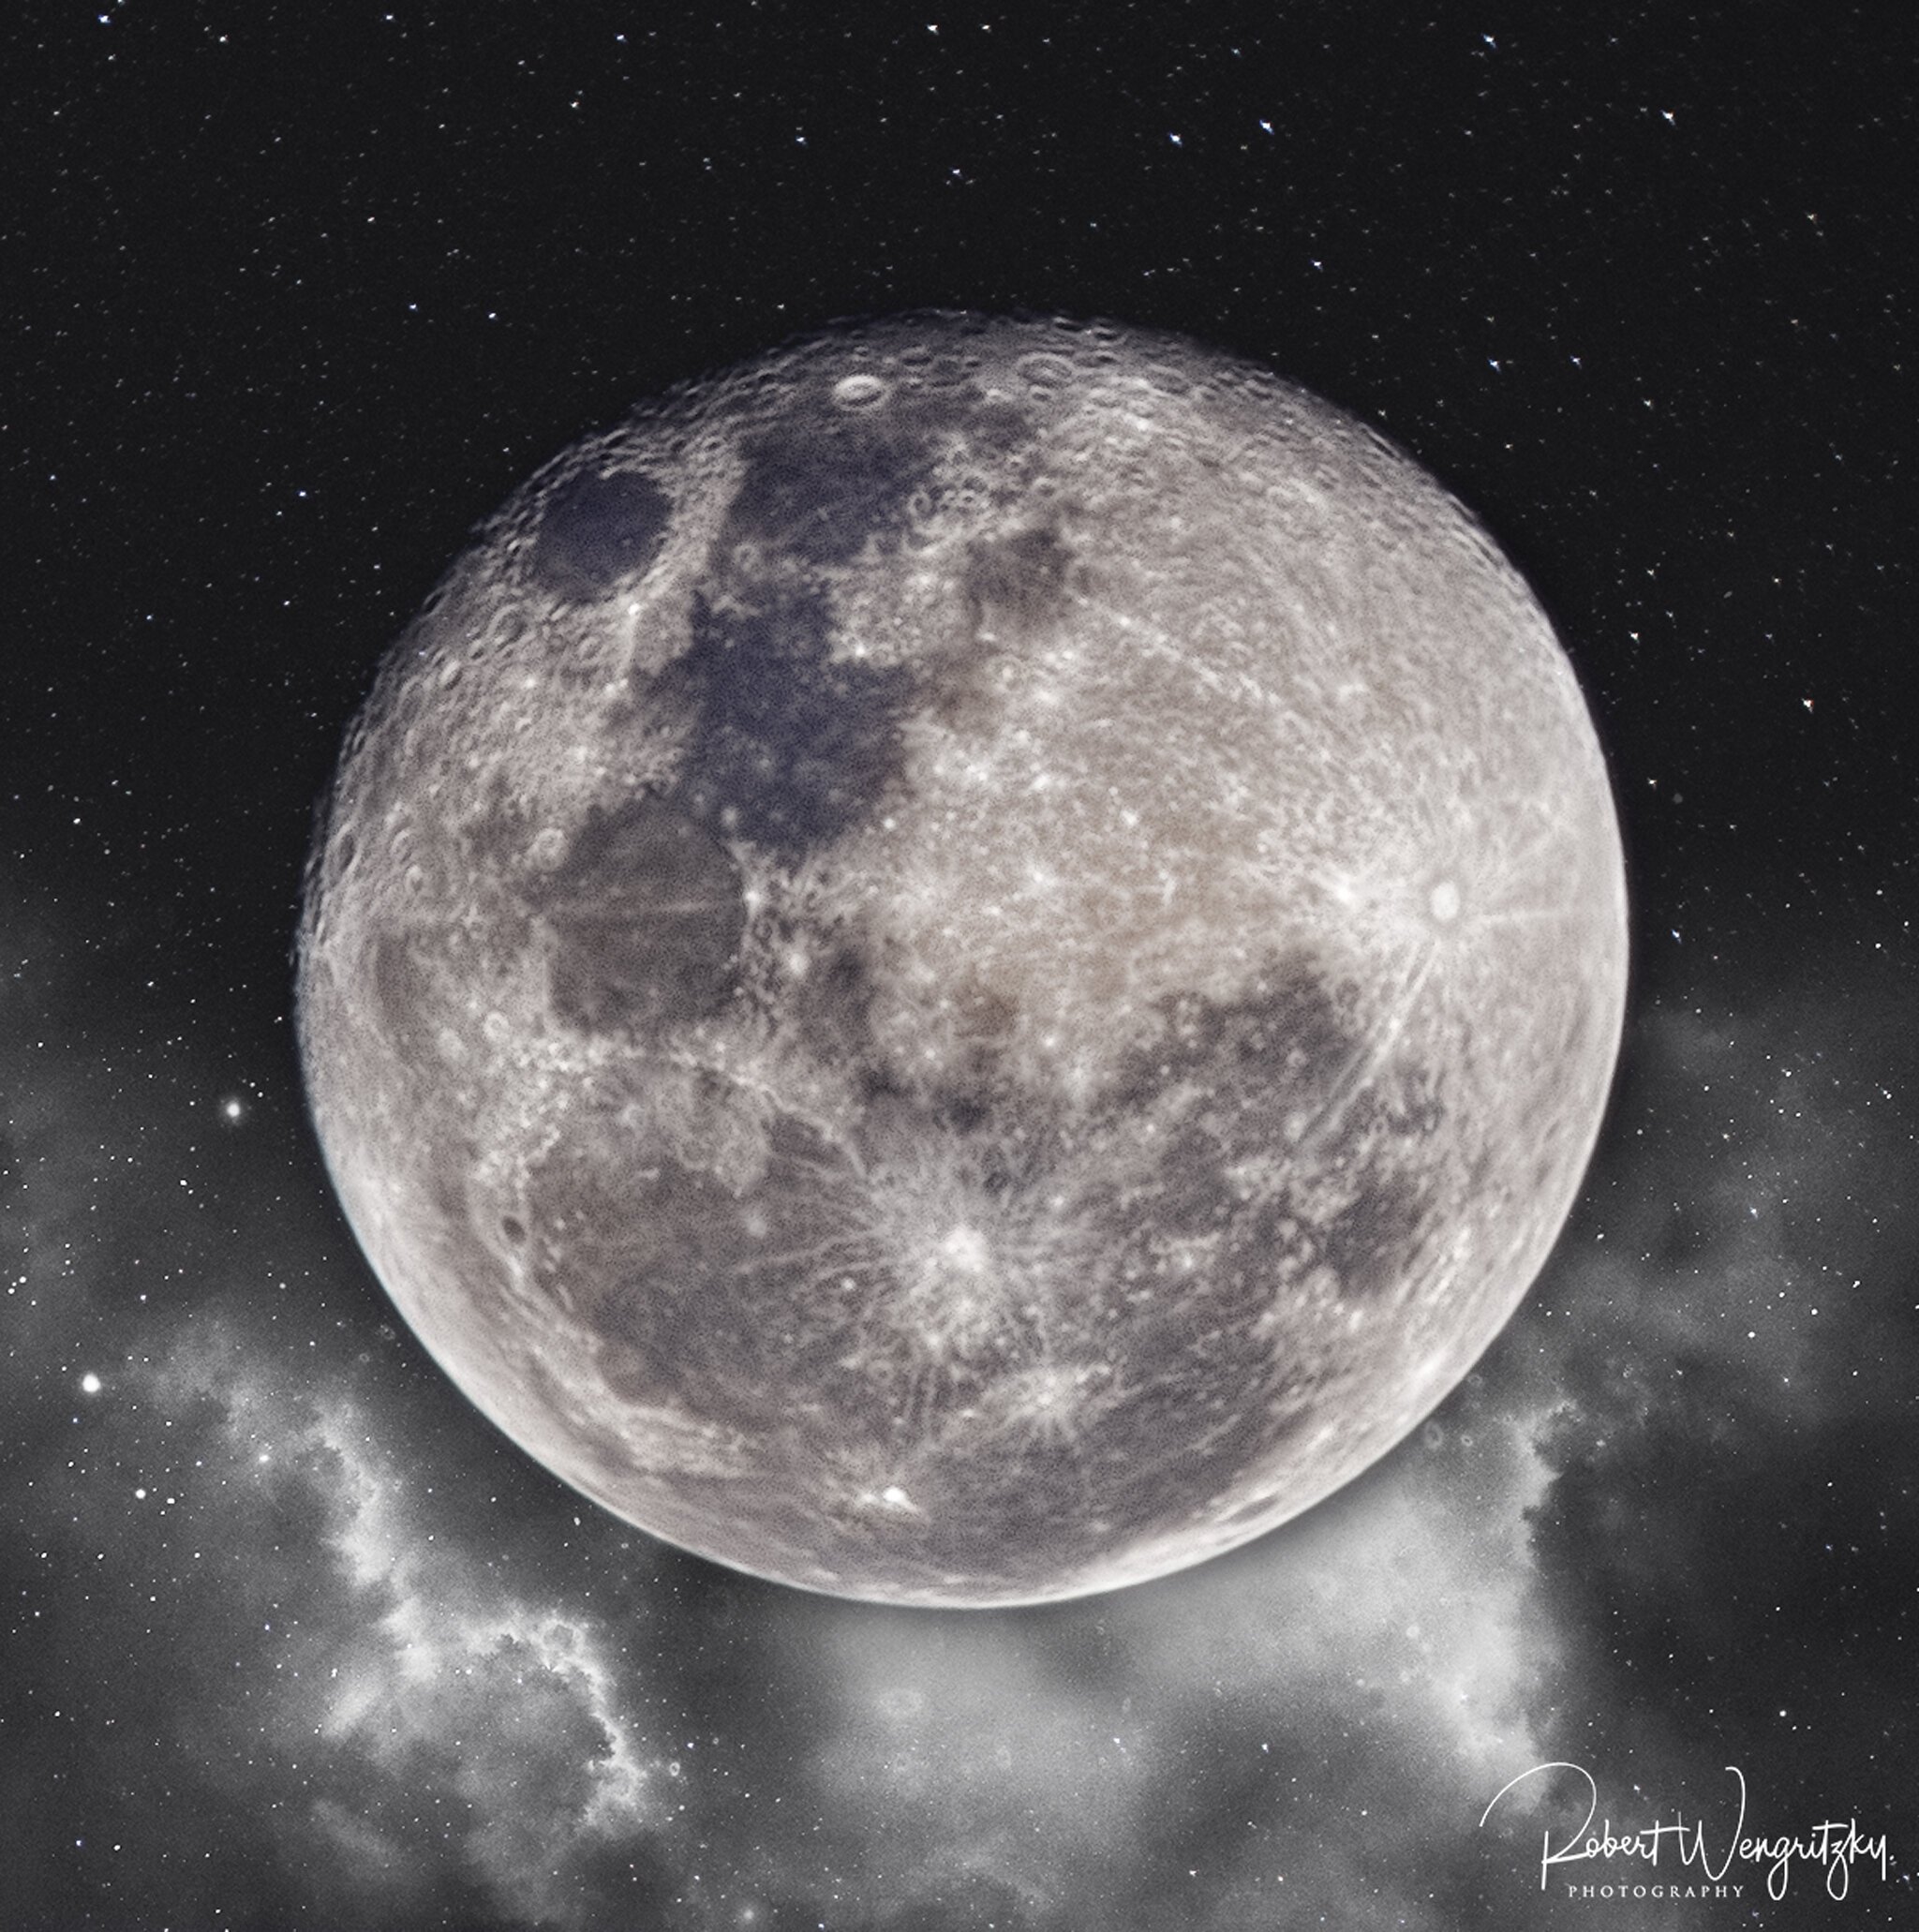
A 200 image stack brings out all the details in the moon and minimises noise
Step 4: Advanced Editing in Photo Editing Software
After stacking your images in Sequator, it's time to enhance and fine-tune the stacked image further using advanced editing techniques in your preferred photo editing software. Here's a detailed breakdown:
4.1: Global Adjustments
Color Grading: Refine the overall color balance to achieve the desired mood. Adjust temperature and tint to enhance or cool down the night sky hues.
Contrast and Brightness: Fine-tune overall contrast and brightness for a balanced and visually appealing image. Be cautious not to lose details in shadows or blow out highlights.
Saturation and Vibrance: Enhance the richness of colors by adjusting saturation and vibrance. Pay attention to individual color channels for precise control.
4.2: Local Adjustments
Graduated Filters: Use graduated filters to selectively adjust exposure or color temperature across different parts of the image. This is particularly useful for balancing the brightness of the sky and foreground. Alternatively use Luminosity masks to help achieve even more localised adjustments
Radial Filters: Draw attention to specific elements in your astrophotograph by applying radial filters. This can be effective for creating a subtle vignette or highlighting the central portion of the image.
4.3: Detail Enhancement
Sharpening: Apply sharpening to enhance details in the stars and other elements. Use a light touch to avoid introducing artifacts.
Noise Reduction: Fine-tune noise reduction settings to maintain a clean and smooth appearance, especially in darker areas of the image.
4.4: Creative Enhancements
Split Toning: Experiment with split-toning to add a touch of color to shadows and highlights independently. This can add a creative and unique look to your astrophotographs.
Lens Flare or Light Effects: Introduce subtle lens flares or light effects to enhance the celestial atmosphere. Be mindful not to overdo it—subtle effects often work best.
4.5: Final Touches
Cropping: Make any final adjustments to composition through cropping. Ensure that the composition enhances the overall visual impact.
Export Settings: Choose appropriate export settings based on your intended use. Consider exporting in a high-quality format suitable for printing or sharing online.
Step 5: Layering Techniques
If using Photoshop, consider layering the stacked image with other photos or elements. This may be needed when stacking certain night sky’s to foreground elements (eg/ when creating star trail images, to ensure the foreground stays sharp and crisp)
Experiment with blending modes to create unique visual effects.
Add additional layers for foreground elements or to composite multiple images.
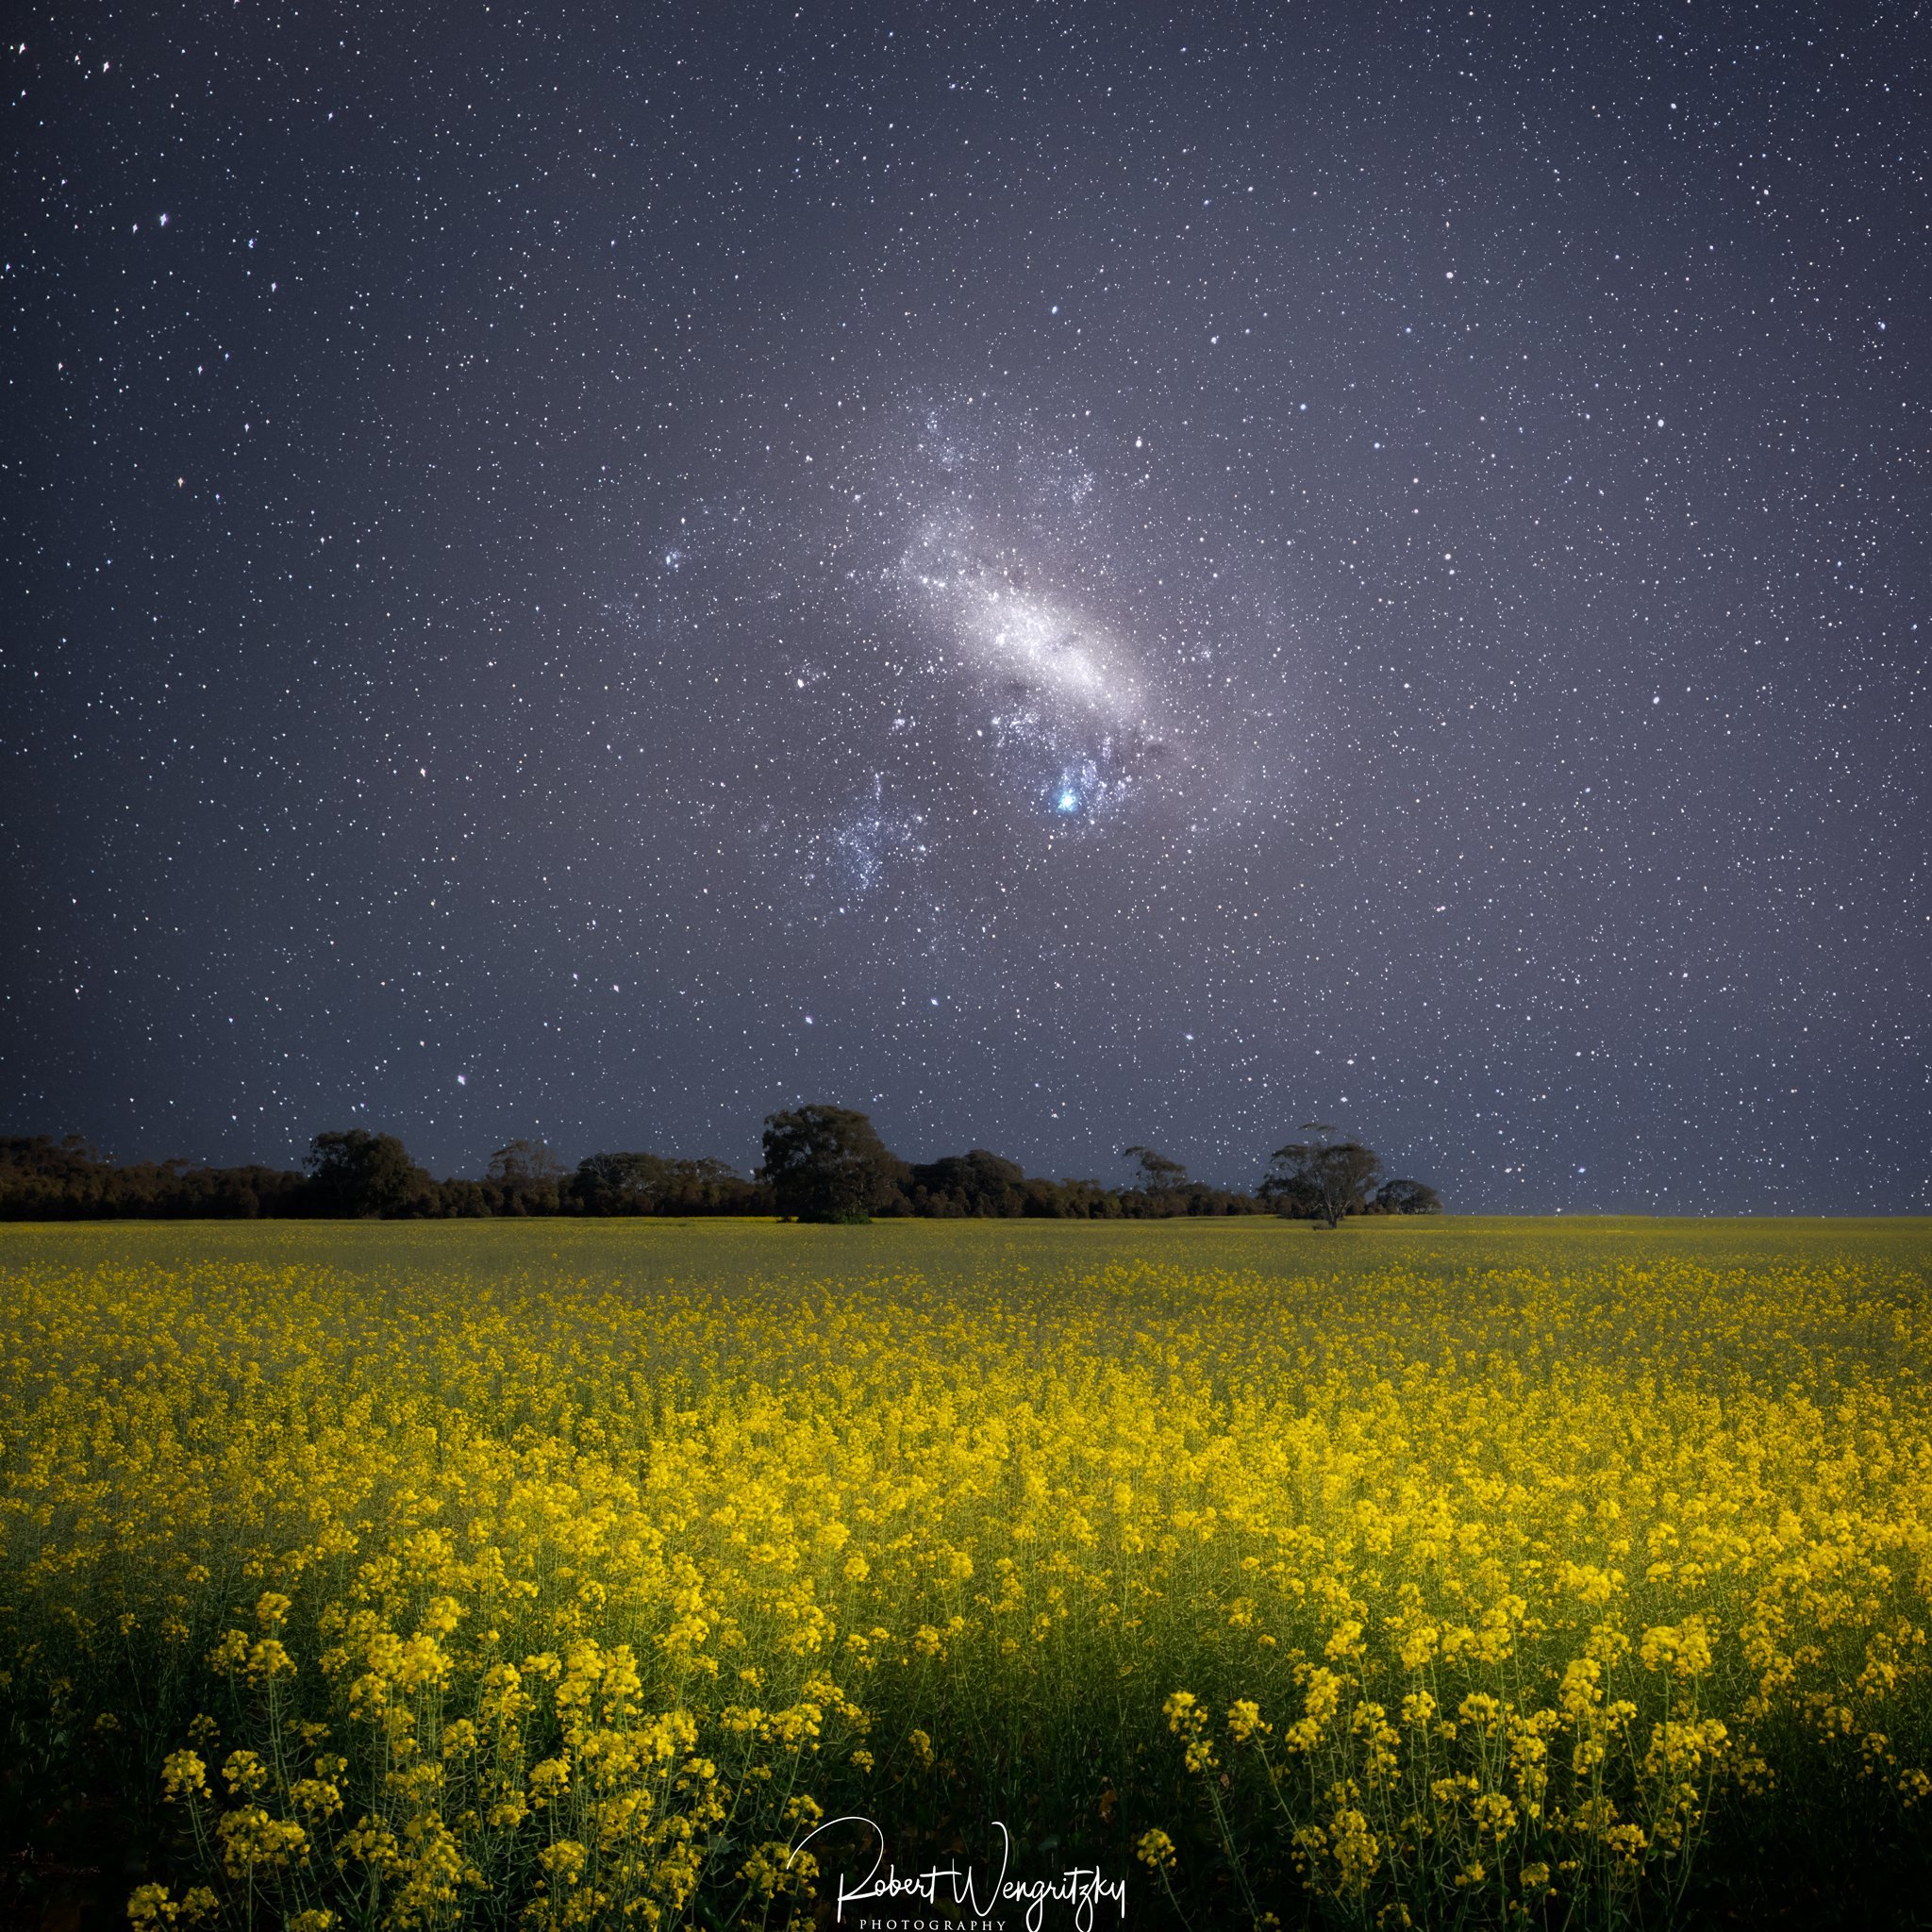
With the canola flowers moving in between each shot, I had to layer the foreground on to my night sky stack separately using layering techniques. This was to ensure the flowers were not all blurry from movement that occurred with long exposure, or blurry from stacking.
Step 6: Final edits
Consider adding text, overlays, or other graphic elements such as your signature as needed.
Step 7: Exporting the Final Image
Once satisfied with the edits, export the final image in your preferred format.
Choose settings that align with your intended use, whether it's for print, web, or social media.
Step 8: Showcasing Your Edited Image
Display the final edited image on your photography website or portfolio.
Share the image on social media platforms to showcase your creative process.
Provide insights into your editing workflow to engage your audience.
Step 9: Repeat and Experiment
Incorporate Sequator into your regular photo editing workflow for various projects.
Experiment with different stacking techniques and editing styles to refine your skills.
Share your experiences and insights with the photography community.
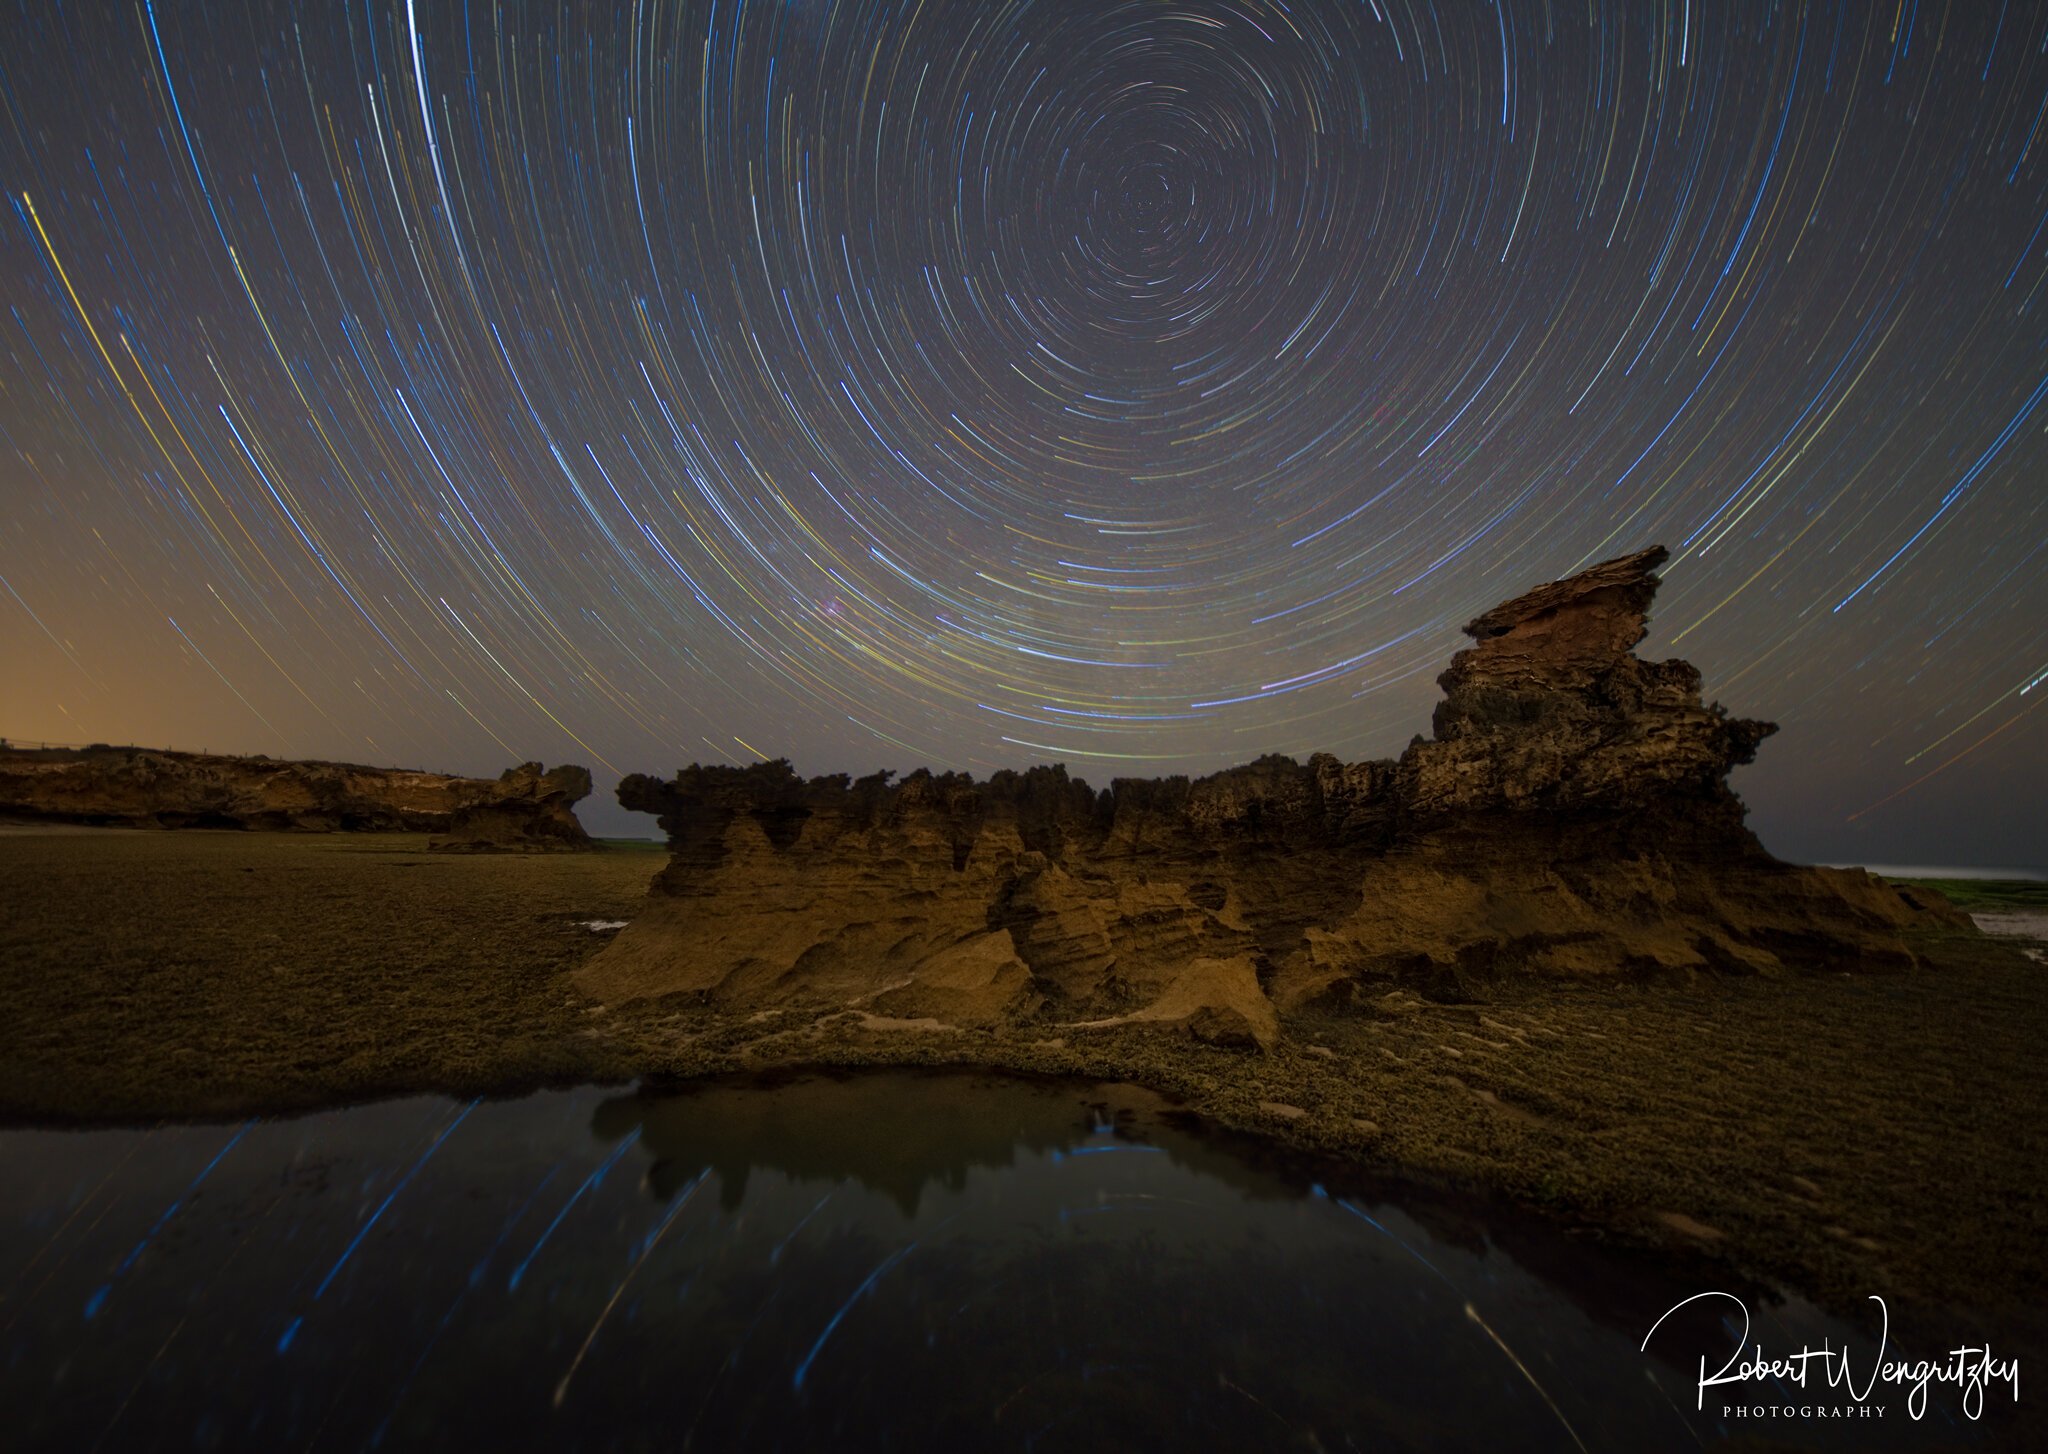
Star Trails in Portsea. Stacked using Sequator, processed in Photoshop